.png)
The Big 3 Exercises for Low Back Pain Relief — A Physical Therapist's Guide for Active Adults in Vermont
- Feb 1
- 8 min read
Updated: May 25
When most people think about strengthening for low back pain, they picture crunches, deadlifts, or some version of "core work" that involves a lot of flexion and movement through the spine. The instinct makes sense — the back hurts, so strengthen the back.
The research tells a more nuanced story.
For the lumbar spine specifically, strength through movement is less important than stability through stiffness. The lumbar spine — your lower back — functions best as a stable joint group, not a mobile one. The thoracic spine above it and the hips below it are designed for mobility. The lumbar spine is designed to resist excessive motion and transfer force efficiently between those two mobile regions.
When that stability breaks down, the passive structures of the spine — discs, facet joints, ligaments — absorb load they were not designed to handle repeatedly. Over time, that is how low back pain develops and persists.
The most effective way to train the lumbar spine for stability is through isometric exercises — movements where the muscles activate and generate force without any joint movement occurring. This builds the muscle endurance and coordination that creates spinal stiffness and resistance to injury, without aggravating already irritated tissue.
The three exercises below — known in the research literature as the McGill Big 3, developed by spine biomechanics researcher Dr. Stuart McGill — have among the strongest evidence bases of any exercises for improving spinal stability and reducing low back pain. They are safe for most people in most presentations, and they form the foundation of how we approach low back rehabilitation at Snow Beast Performance.
As with any condition, individual cases vary. These exercises are a strong starting point for many people, but they are not universal. Working with a qualified physical therapist ensures you are doing the right exercises for your specific situation and progressing them appropriately.
Why Stiffness — Not Flexibility — Is the Goal for Low Back Pain
Before getting into the exercises, it is worth addressing one of the most common misconceptions we encounter: the idea that a tight or painful low back needs to be stretched and mobilized to feel better.
For some presentations, gentle mobility work has a role. But for most mechanical low back pain, the spine is not too stiff — it is insufficiently stable. The muscles that should be creating stiffness and protecting the spine are underperforming, and the spine is moving more than it should under load.
Stretching a spine that lacks stability can temporarily relieve tension but does nothing to address the underlying instability — and in some cases makes it worse by further increasing range of motion in a region that already has too much.
The Big 3 work by building the endurance and coordination of the muscles that stabilize the lumbar spine — creating the stiffness that protects it during the demands of skiing, trail running, hiking, and everyday life.
How to Use These Exercises
A few principles that apply to all three exercises before you start:
Start where you are, not where you think you should be. If a 10-second hold causes your form to break down or your back to move, shorten the hold time. A perfect 3-second hold is more valuable than a compromised 10-second one.
The spine should not move. This is the single most important cue across all three exercises. Movement of the lumbar spine during these exercises defeats the purpose. If you feel your back arching, flattening, or rotating, reduce the hold time or regression the exercise until control is established.
Use descending repetition sets. The rep scheme below — 6, 4, 2 — is intentional. It manages fatigue progressively so that quality of stabilization does not break down as the set continues. Fatigued stabilizers doing poor-quality work can aggravate an irritated spine.
Progress is measured in endurance, not load. The goal is working up to 10-second holds across the full rep scheme, performed with complete spinal control. Once that is achieved, variations and progressions can be introduced.
Exercise 1: The Modified Curl-Up
The modified curl-up targets the anterior core — specifically the rectus abdominis and the deep stabilizers — without the spinal flexion that makes traditional crunches problematic for people with low back pain.
Starting position: Lie on your back with one knee bent and the foot flat on the floor. Keep the other leg straight. If you have a more painful side, make that the straight leg. Place both hands, palms down, under the small of your back — this supports the natural lumbar curve and helps you feel if the back starts to move.
The movement: Gently lift your head and shoulders just slightly off the ground — as if you were taking the weight of your head off an imaginary pillow. This is a very small movement. You do not need significant height, and your low back should remain completely still throughout. If you feel your back pressing into your hands or arching away from them, you have lifted too high.
Sets and reps: Begin with a hold duration you can complete without back movement — even 3 seconds is a valid starting point. Use the descending set structure: 6 repetitions, rest one full minute, 4 repetitions, rest one minute, 2 repetitions. Work toward 10-second holds across all sets before adding difficulty.

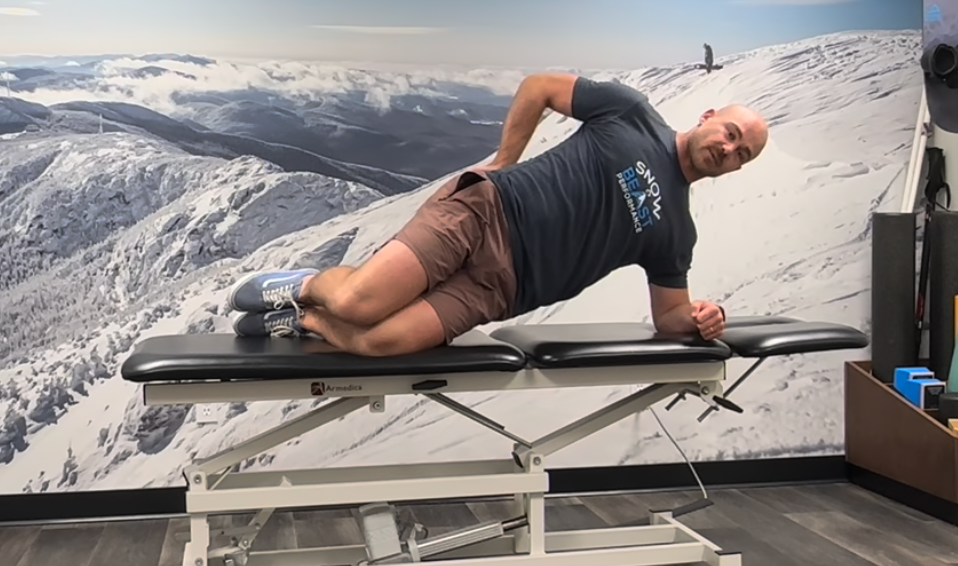
Exercise 2: The Side Plank
The side plank targets the lateral stabilizers of the trunk — the quadratus lumborum and the obliques — which are critical for resisting lateral bending and rotational forces on the spine. These muscles are heavily loaded during skiing, snowboarding, and any single-leg activity.
Starting position: Lie on your side with knees bent and legs stacked. Prop your upper body onto your bottom elbow, positioned directly below your shoulder. Place your top hand on your bottom shoulder to keep the upper body stable.
The movement: Raise your hips off the ground so your body is supported by your knees and your elbow. Your body should form a straight line from head to knees. Hold this position without letting your hips sag or rotate.
Sets and reps: Complete one set of 6 repetitions on the first side, then immediately switch to the other side for 6 repetitions. Return to the first side for 4 repetitions, then the other for 4, then 2 on each side. Alternating sides manages fatigue and ensures both sides are trained equally — important for an exercise where side-to-side asymmetry is common and clinically relevant.
Progression note: Once the knee-supported version is controlled, the exercise can be progressed to feet-supported (full side plank) for greater challenge.
Exercise 3: The Bird Dog
The bird dog trains the posterior chain stabilizers — the multifidus and erector spinae — along with the hip extensors, in a position that directly mimics the demands of athletic movement. It is one of the most functional of the three exercises for outdoor athletes because it requires coordinated stability through the trunk while the limbs are moving independently.
Starting position: Start on hands and knees with a neutral lumbar spine — a slight natural arch, not completely flat. Your hands should be directly under your shoulders and knees directly under your hips. You can make fists if wrist discomfort is an issue.
The movement: Simultaneously reach one leg straight back and the opposite arm straight forward. The key is to reach long — thinking about lengthening rather than lifting will keep the back from arching. Your lumbar spine should not move at all during this. The limbs move; the trunk stays completely still.
If arm and leg together is too challenging initially, start with the leg alone until control is established.
Sets and reps: Hold up to 10 seconds, starting at whatever duration allows full spinal control. Complete 6 repetitions with one arm and opposite leg, then switch pairs for 6 more. Follow with sets of 4 on each pair, then 2 on each pair. Rest one minute between each full round.

Putting It Together for Your Low Back
These three exercises work best as a daily practice rather than an occasional intervention. The goal is building endurance and coordination in the stabilizing system — qualities that develop through consistency over weeks, not intensity over a single session.
For skiers, snowboarders, trail runners, and hikers in Vermont, a healthy and stable lumbar spine is one of the most important physical assets you can maintain. It determines how efficiently you can transfer force from your lower body through your trunk, how well you hold your form when you are tired, and how resilient you are to the cumulative load of a long season.
If you have been dealing with low back pain and want to understand what is driving it and how to address it beyond these foundational exercises, we would love to help. Our physical therapy services in Williston, Vermont include a comprehensive evaluation that looks at the full picture — not just the area that hurts.
And if you have not read our companion post on low back pain myths, that is a great place to start — it addresses many of the common beliefs about back pain that can actually make recovery harder.
Also, understanding why you feel pain during rehabilitation makes a meaningful difference in how you respond to it — read our post on calming overactive pain receptors.
Every new client begins with a free 15-minute discovery call. No commitment required — just a conversation about what you are dealing with and how we can help.
FAQ: The Big 3 Exercises for Low Back Pain
Who developed the McGill Big 3 and what is the research behind them? The Big 3 were developed and extensively researched by Dr. Stuart McGill, a spine biomechanics researcher and professor emeritus at the University of Waterloo. His research demonstrated that isometric spinal stabilization exercises produce significantly better outcomes for low back pain than traditional flexion-based exercises like crunches or sit-ups, particularly for people with disc-related pain or mechanical instability. His book Low Back Disorders is a foundational reference in physical therapy and sports medicine.
Can I do these exercises if I am currently in pain? In most cases yes — these exercises are specifically designed to load the stabilizing system without aggravating irritated spinal tissue. The key is starting conservatively, using shorter hold times, and stopping if any exercise produces increased pain. If your pain is severe, recent, or accompanied by symptoms like leg numbness, tingling, or weakness, see a physical therapist before starting any exercise program.
How long until I see results from the Big 3? Most people notice a meaningful reduction in pain and improvement in stability within 4 to 6 weeks of consistent daily practice. Full development of the endurance and coordination the exercises are building takes longer — typically 8 to 12 weeks. Progress is gradual and cumulative, which is why consistency matters more than intensity with these exercises.
Should I do these exercises every day? Yes — daily practice is appropriate for these exercises because they are low-load and isometric. Unlike strength training exercises that require recovery days, the Big 3 are designed to build endurance and motor control through frequent repetition. Many people with chronic low back pain do them as a daily maintenance practice indefinitely.
When should I progress beyond the Big 3? Once you can complete the full rep scheme — 10-second holds across 6, 4, and 2 sets — with complete spinal control and no pain, you are ready to progress. A physical therapist can assess your movement quality and introduce appropriate progressions based on your specific goals, whether that is returning to skiing, building toward a trail race, or simply moving through daily life without pain.
Written by Stephen Burkert, DPT — Snow Beast Performance, Williston, VT


Comments